

How To Create The Perfect XML Sitemap
Are you wondering how to generate an XML sitemap for your website? This guide will walk you through all the steps you need to create and implement one.
While Google and other search engines are improving at finding pages with their crawlers, sitemaps still help by effectively giving them more data about your web pages. Many XML sitemap generators are available for purchase or even for free. Your CMS may already have one built in. These applications do what they’re supposed to – crawl your site and spit out a properly formatted, static XML sitemap.
The main issue with XML sitemap generators is that they don’t automatically know which URLs should be included or excluded. While some tools can be set to follow directives like robots.txt and canonical tags, they aren’t foolproof. Unless your site is perfectly optimized, you must manually refine the sitemap. It’s rare for large, database-driven sites to be perfectly optimized, so these tools often produce incomplete or bloated sitemaps. Common problems include duplicate pages from URL parameters, language directories that get incorrectly added, and stray folders revealing process files or junk pages. The more dynamic the site, the more likely unwanted URLs will appear in the XML sitemap.
The XML sitemap should only expose the URLs you want Google to know about. Nothing more, nothing less. The XML sitemap file helps search engines get a data dump of all your important pages and supplement what they haven’t found on their own. In return, this allows these “unfound” pages to get found, crawled, and ideally (hopefully) rank within the search results.
So, what should be in the ultimate XML sitemap?
- Only pages that 200 (page found). No 404’s, redirects, 500 errors, etc.
- Only pages that are not blocked by robots.txt.
- Only pages that are the canonical page.
- Only pages that relate to the second-level domain (meaning, no subdomains – they should get their own XML sitemap)
- In most cases, only pages that are of the same language (even if all your language pages are on the same .TLD, that language usually gets its own sitemap)
So, in the end, the perfect XML sitemap file should 100% mirror what – in a perfect world – Google is supposed to crawl and index. Ideally, your website/CMS has an automatic process for routinely building these perfect sitemaps without your intervention. As new products or pages come in and go out, your XML sitemap should simply rewrite itself. However, the rest of this post explains how to generate a sitemap when a prototype sitemap is needed or as a quick fix for a broken sitemap generator.
What Does An Xml Sitemap Look Like?
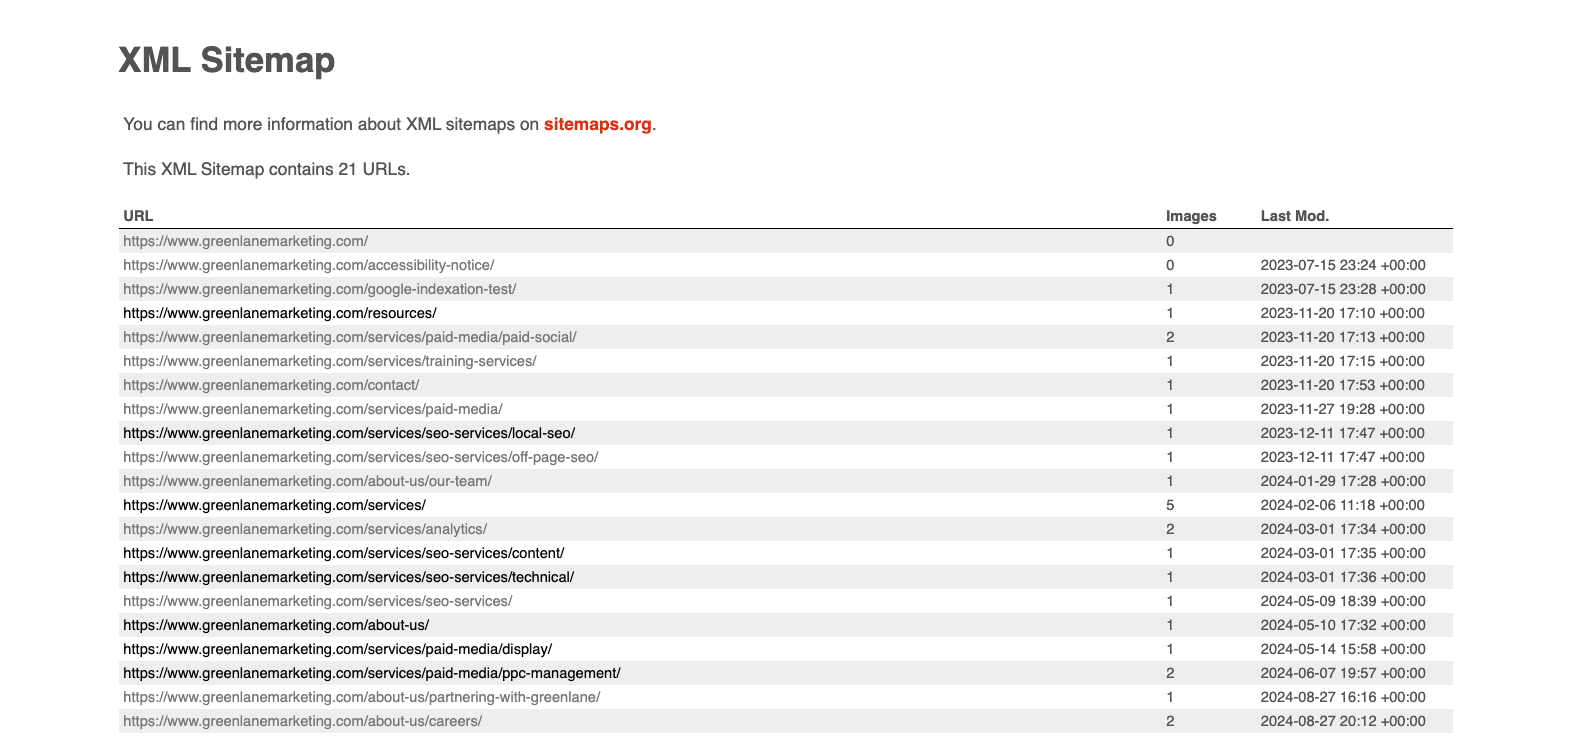
An XML sitemap will list your site’s URLs you want Google to prioritize crawling. Look at our site map to see how one is properly structured.
How To Make A Sitemap?
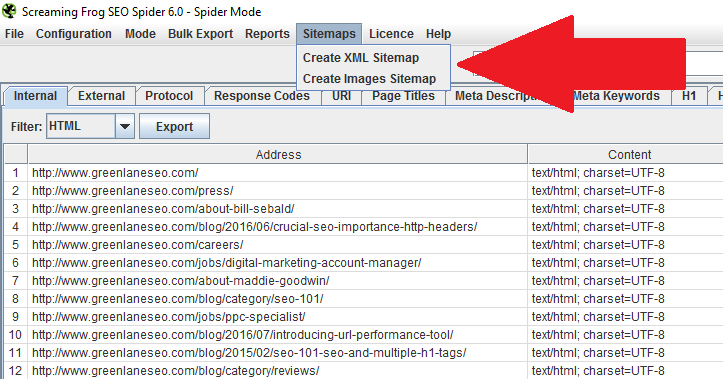
Screaming Frog is an incredibly powerful site crawler that is ideal for all kinds of SEO tasks. One of its several features is the ability to export perfectly written XML sitemaps. If your export is significant, it will adequately break the sitemaps up and include a sitemapindex.xml file. While at it, you can even export an image-only XML sitemap. Screaming Frog is free for small crawls, but pony up for the paid version if you have a website larger than 500 URLs. This is one tool you’ll be happy you paid for if you do SEO work. It’s a mere £99 per year (or $130).
You’re ready to go once you install Screaming Frog on your desktop. If you are working on extremely large sites, you’ll probably need to expand its memory usage. Out of the box, Screaming Frog allocates 512mb of RAM for its use. As you can imagine, the more you crawl, the more memory you’ll need.
Download > Screaming Frog
Setting Up For The Perfect Crawl
Screaming Frog looks like a lot but is very easy to use. In the Configuration > Spider setting, you can use several checkboxes to tell Screaming Frog how to behave. We’re trying to get Screaming Frog to emulate Google, so we want to make some checks here.
Check the following boxes before you run your crawl:
- Respect Noindex
- Respect Robots.txt
- Do not crawl nofollow
- Do not crawl external links
- Respect canonical
At this point, I recommend crawling the site. Consider this the first wave.
How to Examine Crawl Data for Sitemap Creation
Export the complete site data from Screaming Frog. We’re going to evaluate all the pages in Excel or Google Sheets. While we know we took some steps to show us only things search engines can access on their own, we want to make sure there aren’t pages they are seeing that we didn’t know about. You know, those ?color= parameters on eCommerce sites or /search/ URLs that you might not want to be indexed. I like sorting the URL column (A-Z) to scan down and see duplicate URLs quickly.
This data is super valuable not only for creating a strong XML sitemap but also for blocking pages on your website that need some tightening up. Unless your site is 100% optimized, this is a valuable, hard look at potentially runaway URLs. I recommend doing this crawl and looking at your data at least once per quarter.
Scrubbing Out Bad URLs
In this case, a “bad” URL is simply one we don’t want Google to see. Ultimately, we’ll need to make these further exclusions available to Screaming Frog. At this point, you have two options.
- We can either upload your clean Excel list back into Screaming Frog,
- or run a new Screaming Frog crawl with the exclusions built in.
Option 1: Using your spreadsheet, delete the rows containing URLs you don’t like. Speed up the process using Excel’s filters (i.e., contains, does not contain, etc.). The only column of data we care about is the one with your URLs. Also, use Excel’s filters to show only the 200 (page found) URLs. The time it takes to audit this spreadsheet depends on how many URLs you have, different types of URL conventions, and how comfortable you are with Excel.
Next, copy the entire column of “good” URLs and return to Screaming Frog. Use the Mode > List option to start a new crawl. Paste your URLs and start your crawl. Once all the appropriate URLs are back into Screaming Frog, move on to the next section.
Option 2: Now that you know the URLs you want to block, you can do it with Screaming Frog’s exclude feature. Configure > Exclude opens a small window to enter regular expressions (regex). Not familiar with regex? No problem. It’s very easy, and Screaming Frog gives you great examples. https://www.screamingfrog.co.uk/seo-spider/user-guide/configuration/#exclude.
(Alternatively, you can use the include function if there are certain types of URLs or sections you specifically want to crawl. Take the directions above, and simply reverse them.) Once you have a perfect crawl in Screaming Frog, move on to the next section below.
Export The XML Sitemap
At this stage, you’ve either chosen Option 1 or Option 2 above. You have all the URLs you want to be indexed loaded in Screaming Frog. Now, you need to do the simplest step of all—export!
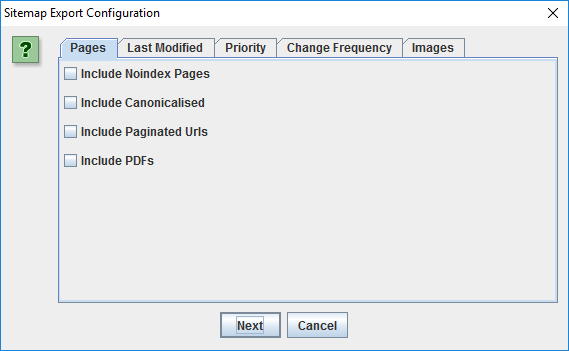
You have some extra checkboxes to consider. If you ask me, it’s a very smart set of selections.
This helps you refine what goes into the XML sitemap in case you missed something in the steps above. Select what makes sense to you, and execute the export. Screaming Frog will generate the sitemaps to your desired location, which you’re ready to upload to your website. Don’t forget to get these new sitemaps into your Google Search Console and Bing Toolbox sitemap uploader.
(If you need some clarity on what these definitions are, visit https://www.sitemaps.org/protocol.html)
You’re all set! Remember, this is just a snapshot of your ever-changing site. I still thoroughly recommend generating a dynamic XML sitemap that updates as your site changes. Creating a Google sitemap will help ensure your site is always indexed correctly. I hope this was helpful!